目录
准备
安装包准备
Ambari2.7.5、HDP3.1.5、libtirpc-devel:
链接: https://pan.baidu.com/s/1J1H4gUnEt204nNBOzlGLIg?pwd=1024
提取码: 1024
jdk1.8:
链接: https://pan.baidu.com/s/1ac5iuH4gVyopn3LuC5QWyQ?pwd=1024
提取码: 1024
pssh-2.3.1:
链接: https://pan.baidu.com/s/11erMCZsYVjJSvyM1f_6Oiw?pwd=1024
提取码: 1024
maven-3.8.3:
链接: https://pan.baidu.com/s/17aeb2PY6Ie24QdOhv8c42w?pwd=1024
提取码: 1024
centos7操作系统:
链接: https://pan.baidu.com/s/1A7tE0P10n0ebC1zVu4sOiQ?pwd=1024
提取码: 1024
服务器配置
centos7环境 hadoop21 5g+32g hadoop22 4g+32g hadoop23 4g+32g
安装passh工具
bashtar -zxf /opt/pssh-2.3.1.tar.gz
mv /opt/pssh-2.3.1 /opt/pssh
cd pssh
python setup.py build
python setup.py install

# 验证安装
pssh --version

# 创建nodes文档,添加需要批处理的服务器节点,为了以后使用方便,在根目录下创建,文件名可随意,方便使用原则
cat >> /node.list << EOF
root@192.168.14.21
root@192.168.14.22
root@192.168.14.23
EOF

# 使用实例
pssh -h /node.list -i 'date'
配置主机名及ssh免密
- 修改主机名
hostnamectl set-hostname hadoop21
分别将3台服务器hostname分别设置为hadoop21、hadoop22、hadoop23
- 修改hosts文件
bashcat >> /etc/hosts << EOF
192.168.14.21    hadoop21
192.168.14.22    hadoop22
192.168.14.23    hadoop23
EOF
- 配置ssh免密
分别在三台服务器上执行
bashssh-keygen -t rsa    # 一直回车即可

# 将ssh私钥拷贝到其他节点上
ssh-copy-id hadoop21
ssh-copy-id hadoop22
ssh-copy-id hadoop23
- 将hosts分发到其他服务器
pscp -h /node.list /etc/hosts /etc/hosts
关闭防火墙及selinux
bash# 关闭防火墙
pssh -h /node.list -i 'systemctl stop firewalld'

# 关闭防火墙开机自启
pssh -h /node.list -i 'systemctl disable firewalld'

# 查看防火墙状态
pssh -h /node.list -i 'systemctl status firewalld'

# 临时关闭selinux
pssh -h /node.list -i 'setenforce 0'

# 永久关闭selinux
pssh -h /node.list -i "sed -ri 's/(^SELINUX=).*/\1disbaled/g' /etc/selinux/config"
设置swap
bashpssh -h /node.list -i 'echo vm.swappiness = 1 >> /etc/sysctl.conf'
pssh -h /node.list -i 'sysctl vm.swappiness=1'
pssh -h /node.list -i 'sysctl -p'
关闭透明大页面
由于透明超大页面已知会导致意外的节点重新启动并导致RAC出现性能问题,因此Oracle强烈建议禁用
bashpssh -h /node.list -i "echo never > /sys/kernel/mm/transparent_hugepage/defrag "
pssh -h /node.list -i "echo never > /sys/kernel/mm/transparent_hugepage/enabled"

# 设置开机关闭
cat >> /etc/rc.d/rc.local << EOF
if test -f /sys/kernel/mm/transparent_hugepage/enabled;then
  echo never > /sys/kernel/mm/transparent_hugepage/enabled
fi
if test -f /sys/kernel/mm/transparent_hugepage/defrag;then
  echo never > /sys/kernel/mm/transparent_hugepage/defrag
fi
EOF

# 将rc.loacal分发到其他节点
pscp -h /node.list /etc/rc.d/rc.local /etc/rc.d/rc.local
pssh -h /node.list -i "chmod +x /etc/rc.d/rc.local"
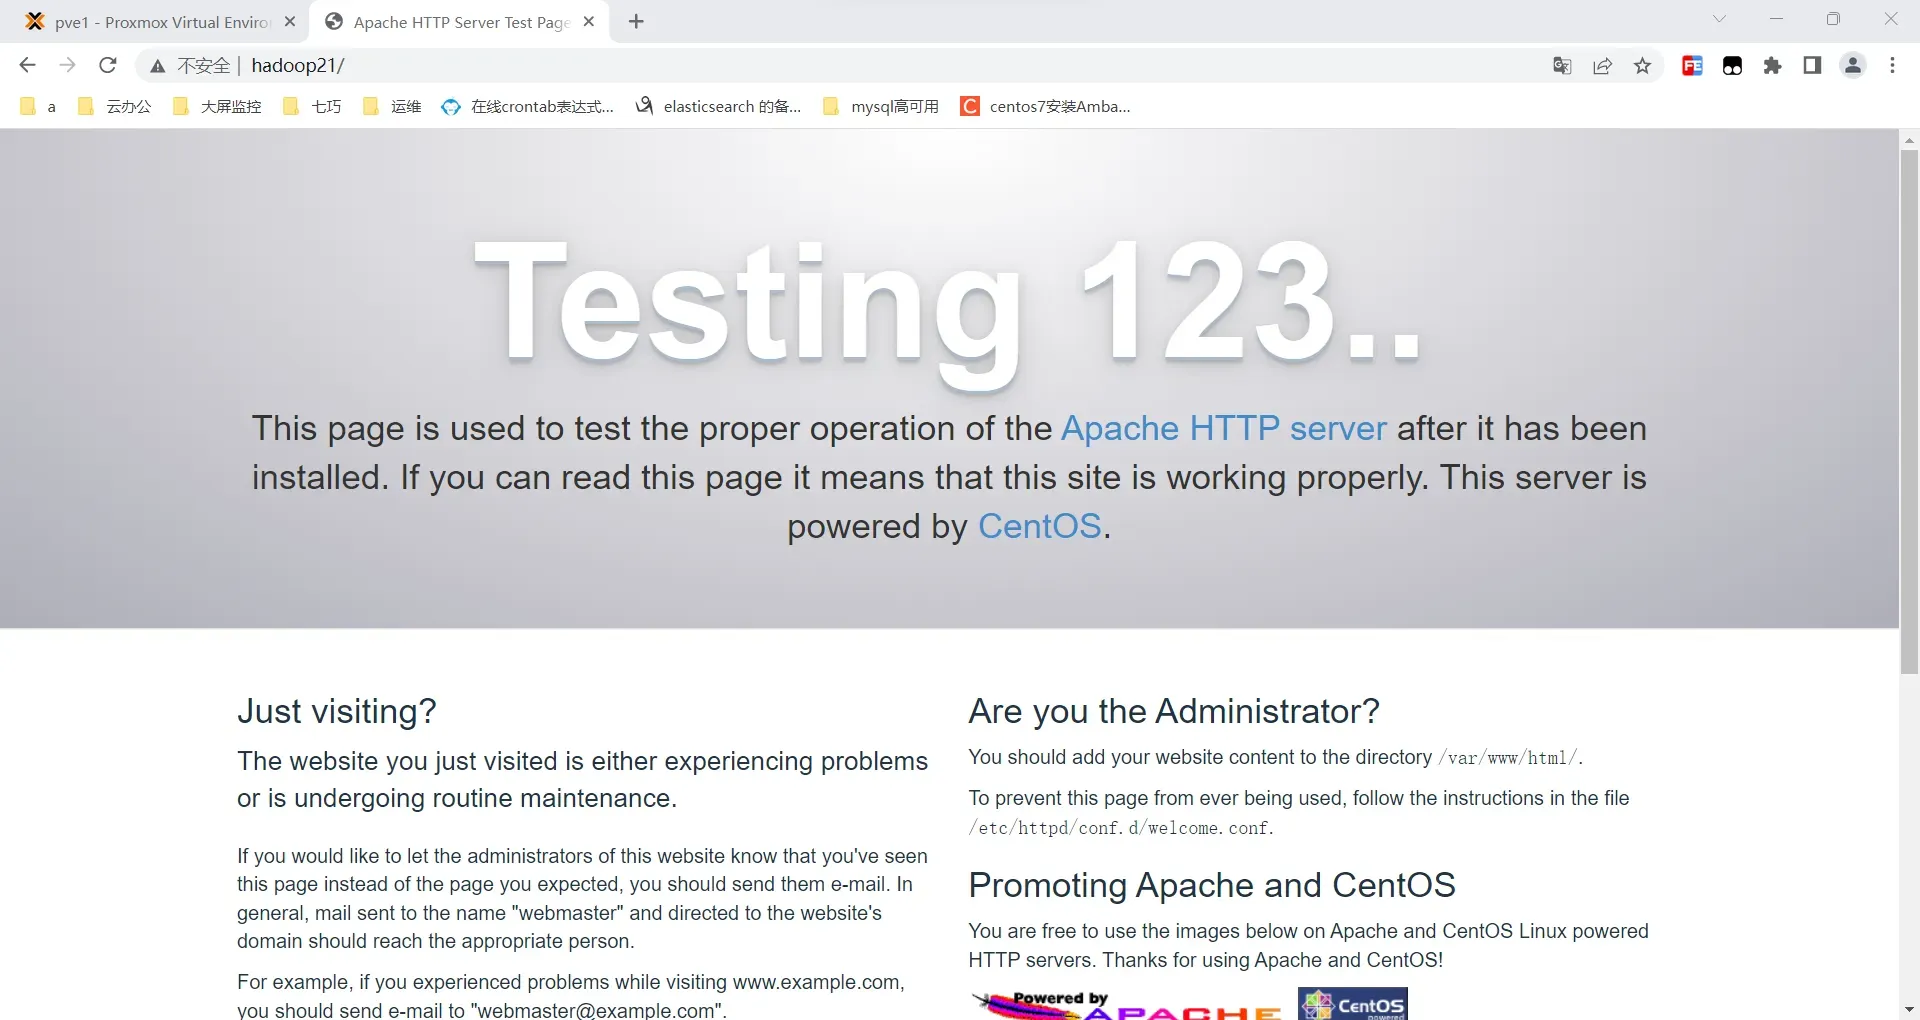
安装http服务
安装apache的httpd服务主要用于搭建OS、Ambari和hdp的yum源。在集群服务器中选择一台服务器来安装httpd服务,命令如下:
bashyum install -y httpd
systemctl start httpd
systemctl enable httpd
systemctl status httpd
浏览器访问http://hadoop21能出现以下结果即成功:
配置操作系统本地repo
1.将centos7系统镜像上传到/media目录
bashls /media/
CentOS-7-x86_64-Minimal-2003.iso
2.挂载操作系统iso文件
bashcd /media
mkdir iso
mount -o loop CentOS-7-x86_64-Minimal-2003.iso /media/iso
查看是否挂载成功
bash[root@hadoop21 ~]# df -h
文件系统                 容量  已用  可用 已用% 挂载点
devtmpfs                 5.8G     0  5.8G    0% /dev
tmpfs                    5.8G     0  5.8G    0% /dev/shm
tmpfs                    5.8G  8.5M  5.8G    1% /run
tmpfs                    5.8G     0  5.8G    0% /sys/fs/cgroup
/dev/mapper/centos-root   30G   14G   16G   47% /
/dev/sda1               1014M  150M  865M   15% /boot
tmpfs                    1.2G     0  1.2G    0% /run/user/0
/dev/loop0               1.1G  1.1G     0  100% /media/iso
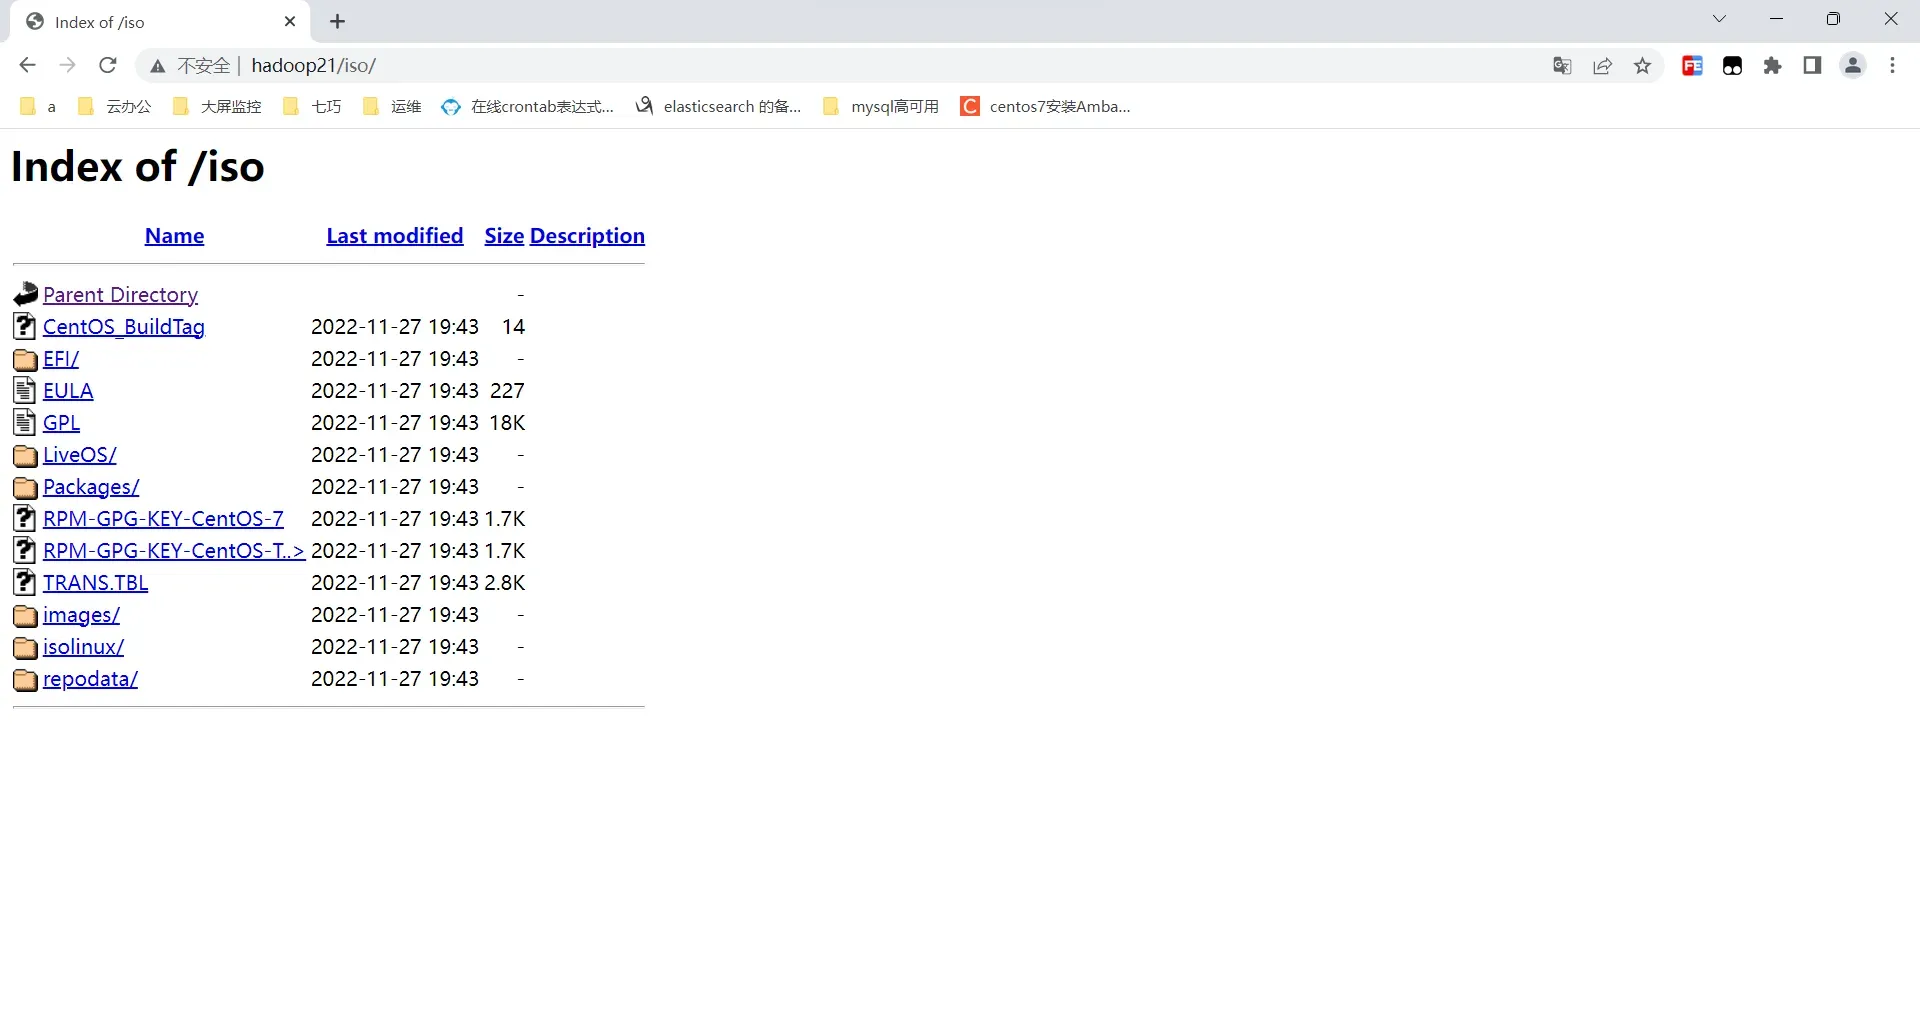
3.在/var/www/html目录下创建iso目录,并将/media/iso目录文件复制到/var/www/html/iso目录下
bashmkdir /var/www/html/iso
cp -r /media/iso/* /var/www/html/iso/
4.在浏览器输入http://hadoop21/iso即可看到iso目录下文件
5.添加配置文件/etc/yum.repos.d/redhat7.6.repo,配置操作系统yum源
bashcat >> /etc/yum.repos.d/redhat7.6.repo << EOF
[redhat_os_repo]
name=redhat7.6_repo
baseurl=http://hadoop21/iso/
enabled=true
gpgcheck=false
EOF

# 同步到其他节点
pscp -h /node.list /etc/yum.repos.d/redhat7.6.repo /etc/yum.repos.d/redhat7.6.repo
6.查看yum源是否配置成功
bashpssh -h /node.list -i 'yum clean all'
pssh -h /node.list -i 'yum repolist'
以下结果则表示成功:

安装jdk
1.将上传的jdk压缩解压,重命名
bashtar -zxf jdk-8u202-linux-x64.tar.gz
mv jdk1.8.0_202 jdk
2.将jdk文件分发到其他节点
bashpscp -r -h /node.list /opt/jdk /opt/
3.配置java环境变量
bashcat >> /etc/profile.d/myenv.sh << EOF
# JAVA
export JAVA_HOME=/opt/jdk
export PATH=$PATH:$JAVA_HOME/bin
export CLASSPATH=.:$JAVA_HOME/lib/dt.jar:$JAVA_HOME/lib/tools.jar
export JRE_HOME=$JAVA_HOME/jre
EOF
- 将环境变量脚本分发到其他节点
bashpscp -h /node.list /etc/profile.d/myenv.sh /etc/profile.d/myenv.sh
pssh -h /node.list -i 'source /etc/profile'
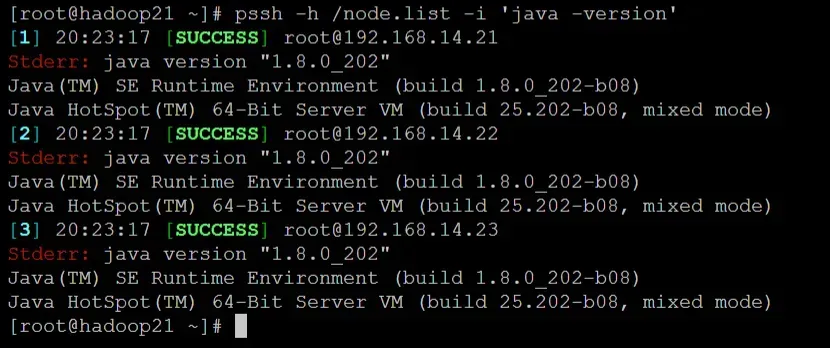
- 验证环境变量是否生效
bashpssh -h /node.list -i 'java -version'
安装maven
1.将上传的maven压缩解压,重命名
bashtar -zxf apache-maven-3.8.3-bin.tar.gz
mv apache-maven-3.8.3 maven
2.配置环境变量,并使其生效
bashcat >> /etc/profile.d/myenv.sh << EOF
# maven
export PATH=$PATH:/opt/maven/bin
EOF
source /etc/profile
3.验证

安装Ambari&HDP
配置Ambari、HDP、libtirpc-devel本地源
1.将上传的ambari、hdp解压
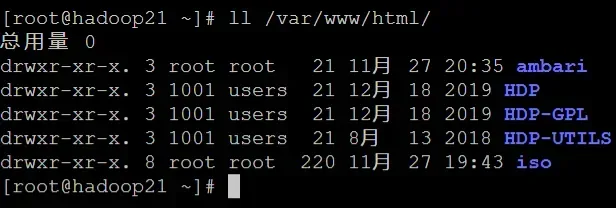
bashtar -zxvf  ambari-2.7.5.0-centos7.tar.gz -C /var/www/html/
tar -zxvf  HDP-3.1.5.0-centos7-rpm.tar.gz -C /var/www/html/
tar -zxvf  HDP-GPL-3.1.5.0-centos7-gpl.tar.gz -C /var/www/html/
tar -zxvf  HDP-UTILS-1.1.0.22-centos7.tar.gz -C /var/www/html/
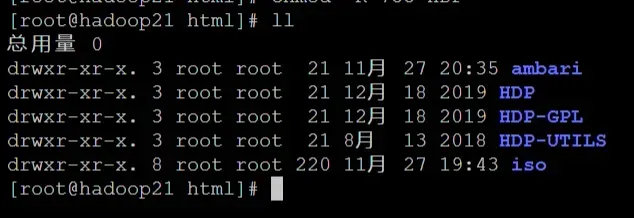
2.查看
3.设置用户组、用户及授权
bashcd /var/www/html/
chown -R root.root HDP*
chmod -R 755 HDP*
4.创建libtirpc-devel本地源
bashmkdir /var/www/html/libtirpc
cd /var/www/html/libtirpc
mv /opt/libtirpc* ./
5.安装createrepo
bashyum install -y createrepo
createrepo .
6.制作本地源
- 配置ambari.repo
bashcat >> /etc/yum.repos.d/ambari.repo << EOF
[Ambari-2.7.5.0]
name=Ambari-2.7.5.0
baseurl=http://hadoop21/ambari/centos7/2.7.5.0-72/
gpgcheck=0
enabled=1
priority=1
EOF
- 配置HDP、HDP-UTILS和HDP-GPL
bashcat >> /etc/yum.repos.d/HDP.repo << EOF
[HDP-3.1.5.0]
name=HDP Version - HDP-3.1.5.0
baseurl=http://hadoop21/HDP/centos7/3.1.5.0-152/
gpgcheck=0
enabled=1
priority=1

[HDP-UTILS-1.1.0.22]
name=HDP-UTILS Version - HDP-UTILS-1.1.0.22
baseurl=http://hadoop21/HDP-UTILS/centos7/1.1.0.22/
gpgcheck=0
enabled=1
priority=1

[HDP-GPL-3.1.5.0]
name=HDP-GPL Version - HDP-GPL-3.1.5.0
baseurl=http://hadoop21/HDP-GPL/centos7/3.1.5.0-152
gpgcheck=0
enabled=1
priority=1
EOF
- 配置libtirpc.repo
bashcat >> /etc/yum.repos.d/libtirpc.repo << EOF
[libtirpc_repo]
name=libtirpc-0.2.4-0.16
baseurl=http://hadoop21/libtirpc/
gpgcheck=0
enabled=1
priority=1
EOF
- 分发到其他节点
bashpscp -h /node.list /etc/yum.repos.d/* /etc/yum.repos.d/
- 查看源是否配置成功
bashpssh -h /node.list -i 'yum clean all'
pssh -h /node.list -i 'yum repolist'
安装mariadb
1.查看当前mysql和mariadb的包
bashrpm -qa | grep -i mysql
rpm -qa | grep -i mariadb
2.卸载旧版本
bashrpm -qa | grep -i mysql | xargs rpm -e --nodeps
rpm -qa | grep -i mariadb | xargs rpm -e --nodeps
3.安装MariaDB服务器
bashyum install mariadb-server -y
4.启动并设置开机自启
bashsystemctl enable mariadb
systemctl start mariadb
5.初始化
bash/usr/bin/mysql_secure_installation
bashNOTE: RUNNING ALL PARTS OF THIS SCRIPT IS RECOMMENDED FOR ALL MariaDB
      SERVERS IN PRODUCTION USE!  PLEASE READ EACH STEP CAREFULLY!

In order to log into MariaDB to secure it, we'll need the current
password for the root user.  If you've just installed MariaDB, and
you haven't set the root password yet, the password will be blank,
so you should just press enter here.

Enter current password for root (enter for none):
OK, successfully used password, moving on...

Setting the root password ensures that nobody can log into the MariaDB
root user without the proper authorisation.

Set root password? [Y/n] Y
New password: 123456
Re-enter new password: 123456
Password updated successfully!
Reloading privilege tables..
 ... Success!

By default, a MariaDB installation has an anonymous user, allowing anyone
to log into MariaDB without having to have a user account created for
them.  This is intended only for testing, and to make the installation
go a bit smoother.  You should remove them before moving into a
production environment.

Remove anonymous users? [Y/n] Y
 ... Success!

Normally, root should only be allowed to connect from 'localhost'.  This
ensures that someone cannot guess at the root password from the network.

Disallow root login remotely? [Y/n] Y
 ... Success!

By default, MariaDB comes with a database named 'test' that anyone can
access.  This is also intended only for testing, and should be removed
before moving into a production environment.

Remove test database and access to it? [Y/n] Y
 - Dropping test database...
 ... Success!
 - Removing privileges on test database...
 ... Success!

Reloading the privilege tables will ensure that all changes made so far
will take effect immediately.

Reload privilege tables now? [Y/n] Y
 ... Success!

Cleaning up...

All done!  If you've completed all of the above steps, your MariaDB
installation should now be secure.

Thanks for using MariaDB!
6.为MariaD安装MySQL JDBC驱动程序
bashtar -zxvf mysql-connector-java-5.1.40.tar.gz
cd mysql-connector-java-5.1.40
mkdir /usr/share/java/
mv mysql-connector-java-5.1.40-bin.jar /usr/share/java/mysql-connector-java.jar
安装和配置ambari-server
1.安装ambari-server
bashyum install -y ambari-server
2.复制MySQL JDBC驱动到/var/lib/ambari-server/resources
bashcp /usr/share/java/mysql-connector-java.jar /var/lib/ambari-server/resources/
3.配置/etc/ambari-server/conf/ambari.properties,添加如下行
bashcat >> /etc/ambari-server/conf/ambari.properties << EOF
server.jdbc.driver.path=/usr/share/java/mysql-connector-java.jar
EOF
4.执行
bashambari-server setup --jdbc-db=mysql --jdbc-driver=/usr/share/java/mysql-connector-java.jar
5.初始化ambari-server
bashambari-server setup
bashUsing python  /usr/bin/python
Setup ambari-server
Checking SELinux...
SELinux status is 'enabled'
SELinux mode is 'permissive'
WARNING: SELinux is set to 'permissive' mode and temporarily disabled.
OK to continue [y/n] (y)? Y
Customize user account for ambari-server daemon [y/n] (n)? Y
Enter user account for ambari-server daemon (root):
Adjusting ambari-server permissions and ownership...
Checking firewall status...
Checking JDK...
[1] Oracle JDK 1.8 + Java Cryptography Extension (JCE) Policy Files 8
[2] Custom JDK
==============================================================================
Enter choice (1): 2
WARNING: JDK must be installed on all hosts and JAVA_HOME must be valid on all hosts.
WARNING: JCE Policy files are required for configuring Kerberos security. If you plan to use Kerberos,please make sure JCE Unlimited Strength Jurisdiction Policy Files are valid on all hosts.
Path to JAVA_HOME: /opt/jdk
Validating JDK on Ambari Server...done.
Check JDK version for Ambari Server...
JDK version found: 8
Minimum JDK version is 8 for Ambari. Skipping to setup different JDK for Ambari Server.
Checking GPL software agreement...
GPL License for LZO: https://www.gnu.org/licenses/old-licenses/gpl-2.0.en.html
Enable Ambari Server to download and install GPL Licensed LZO packages [y/n] (n)? y
Completing setup...
Configuring database...
Enter advanced database configuration [y/n] (n)? y
Configuring database...
==============================================================================
Choose one of the following options:
[1] - PostgreSQL (Embedded)
[2] - Oracle
[3] - MySQL / MariaDB
[4] - PostgreSQL
[5] - Microsoft SQL Server (Tech Preview)
[6] - SQL Anywhere
[7] - BDB
==============================================================================
Enter choice (1): 3
Hostname (localhost): hadoop21
Port (3306): 3306
Database name (ambari): ambari
Username (ambari): ambari
Enter Database Password (bigdata): 123456
Re-enter password: 123456
Configuring ambari database...
Configuring remote database connection properties...
WARNING: Before starting Ambari Server, you must run the following DDL directly from the database shell to create the schema: /var/lib/ambari-server/resources/Ambari-DDL-MySQL-CREATE.sql
Proceed with configuring remote database connection properties [y/n] (y)? y
Extracting system views...
ambari-admin-2.7.5.0.72.jar
....
Ambari repo file doesn't contain latest json url, skipping repoinfos modification
Adjusting ambari-server permissions and ownership...
Ambari Server 'setup' completed successfully.
6.登录MariaDB创建ambari安装所需要的库
bashmysql -uroot -p123456
CREATE DATABASE ambari;
use ambari;
CREATE USER 'ambari'@'%' IDENTIFIED BY '123456';
GRANT ALL PRIVILEGES ON *.* TO 'ambari'@'%';
CREATE USER 'ambari'@'localhost' IDENTIFIED BY '123456';
GRANT ALL PRIVILEGES ON *.* TO 'ambari'@'localhost';
CREATE USER 'ambari'@'hadoop101' IDENTIFIED BY '123456';
GRANT ALL PRIVILEGES ON *.* TO 'ambari'@'hadoop101';

source /var/lib/ambari-server/resources/Ambari-DDL-MySQL-CREATE.sql
show tables;
use mysql;
select host,user from user where user='ambari';
CREATE DATABASE hive;
use hive;
CREATE USER 'hive'@'%' IDENTIFIED BY '123456';
GRANT ALL PRIVILEGES ON *.* TO 'hive'@'%';
CREATE USER 'hive'@'localhost' IDENTIFIED BY '123456';
GRANT ALL PRIVILEGES ON *.* TO 'hive'@'localhost';
CREATE USER 'hive'@'hadoop101' IDENTIFIED BY '123456';
GRANT ALL PRIVILEGES ON *.* TO 'hive'@'hadoop101';

CREATE DATABASE oozie;
use oozie;
CREATE USER 'oozie'@'%' IDENTIFIED BY '123456';
GRANT ALL PRIVILEGES ON *.* TO 'oozie'@'%';
CREATE USER 'oozie'@'localhost' IDENTIFIED BY '123456';
GRANT ALL PRIVILEGES ON *.* TO 'oozie'@'localhost';
CREATE USER 'oozie'@'hadoop101' IDENTIFIED BY '123456';
GRANT ALL PRIVILEGES ON *.* TO 'oozie'@'hadoop101';
FLUSH PRIVILEGES;
启动ambari服务
bashambari-server start
bashUsing python  /usr/bin/python
Starting ambari-server
Ambari Server running with administrator privileges.
Organizing resource files at /var/lib/ambari-server/resources...
Ambari database consistency check started...
Server PID at: /var/run/ambari-server/ambari-server.pid
Server out at: /var/log/ambari-server/ambari-server.out
Server log at: /var/log/ambari-server/ambari-server.log
Waiting for server start.........................
Server started listening on 8080

DB configs consistency check: no errors and warnings were found.
Ambari Server 'start' completed successfully.
所有节点安装ambari-agent
bashpssh -h /node.list -i 'yum -y install ambari-agent'
pssh -h /node.list -i 'systemctl start ambari-agent'
pssh -h /node.list -i 'systemctl enable ambari-agent'
所有节点安装libtirpc-devel
bashpssh -h /node.list -i 'yum -y install libtirpc-devel'
部署集群
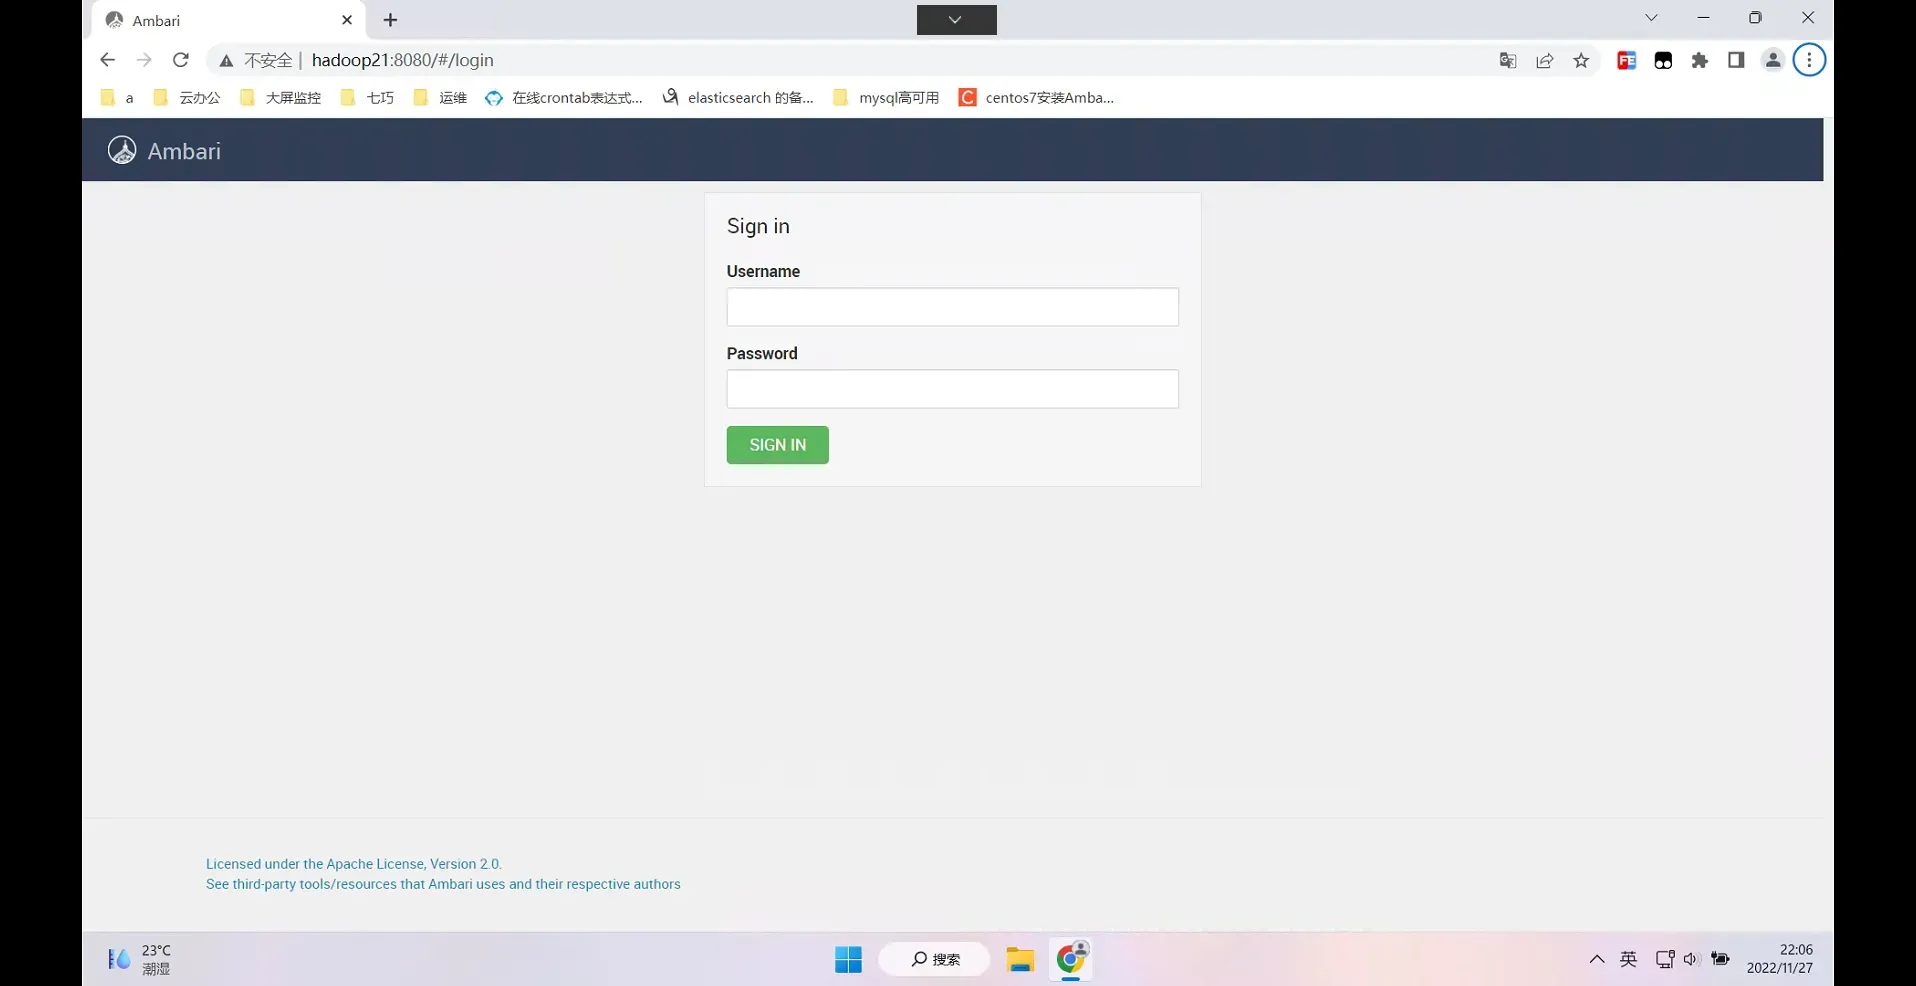
1.登录界面:http://hadoop21:8080
默认管理员账户登录,账户:admin 密码:admin
2.选择版本,配置yum源
- 选择Launch Install Wizard
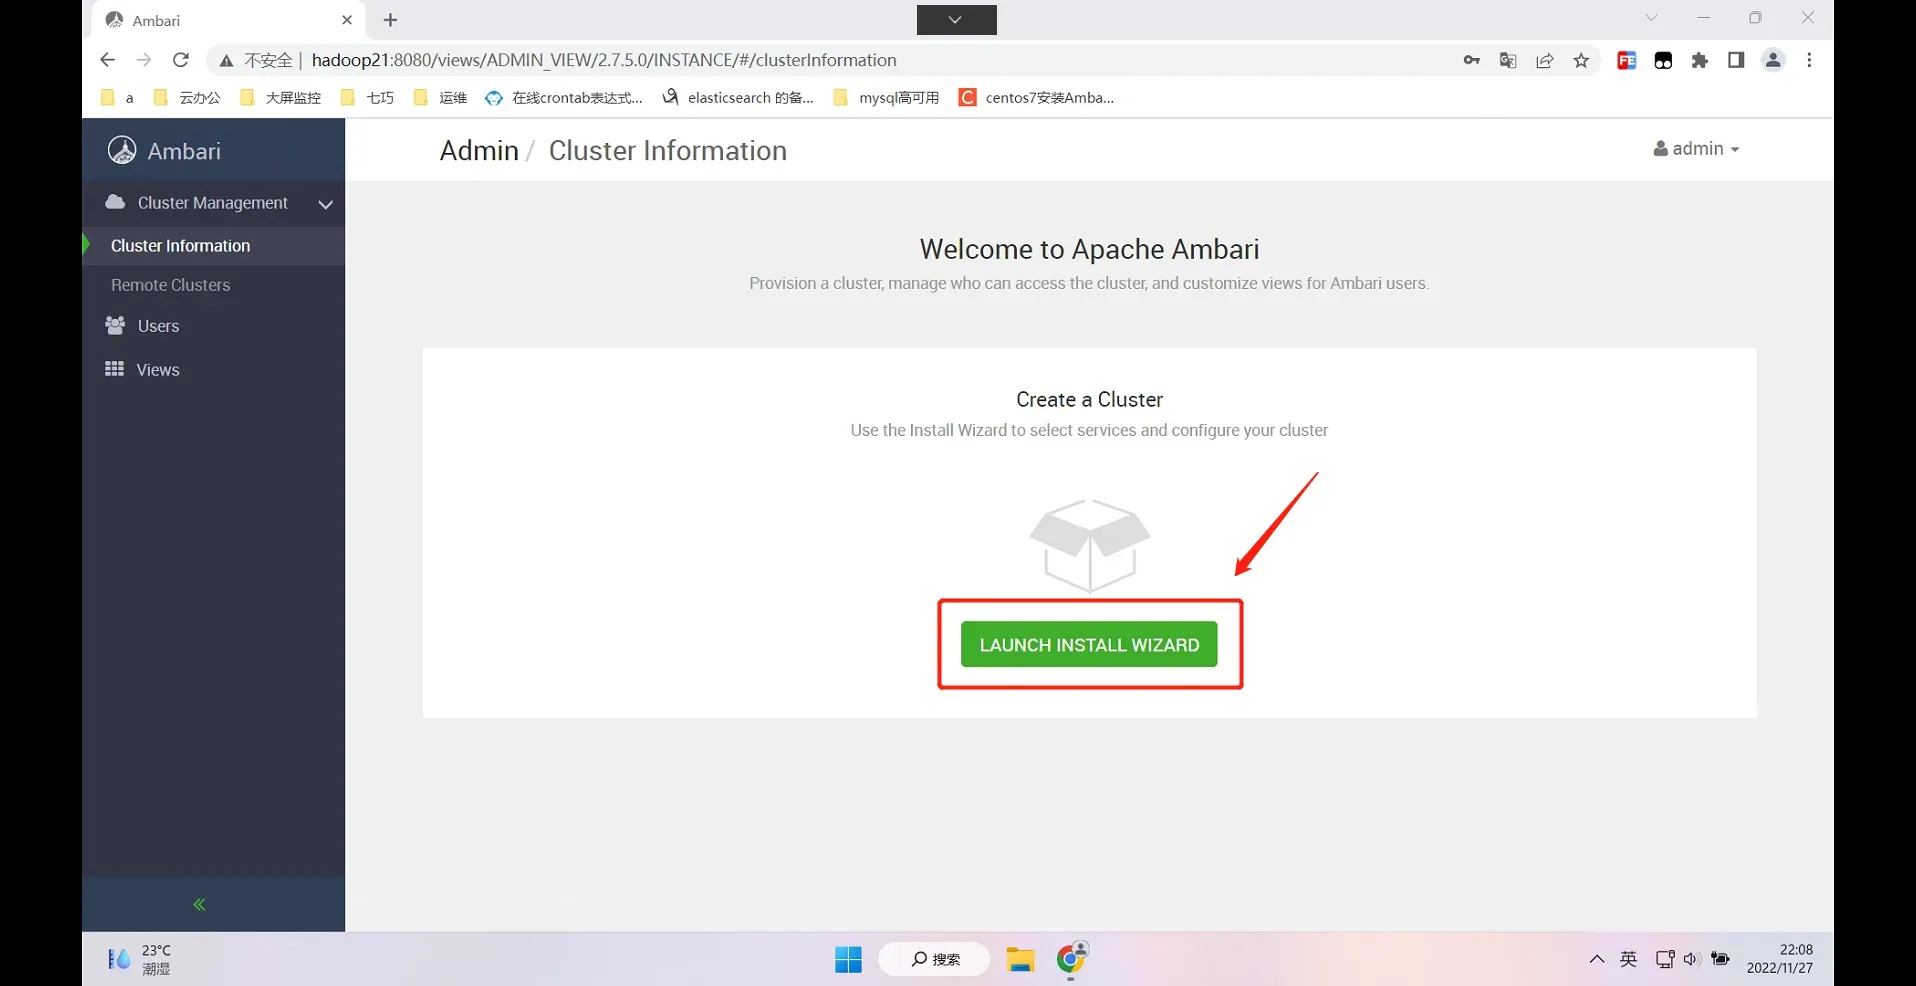
2)配置集群名称

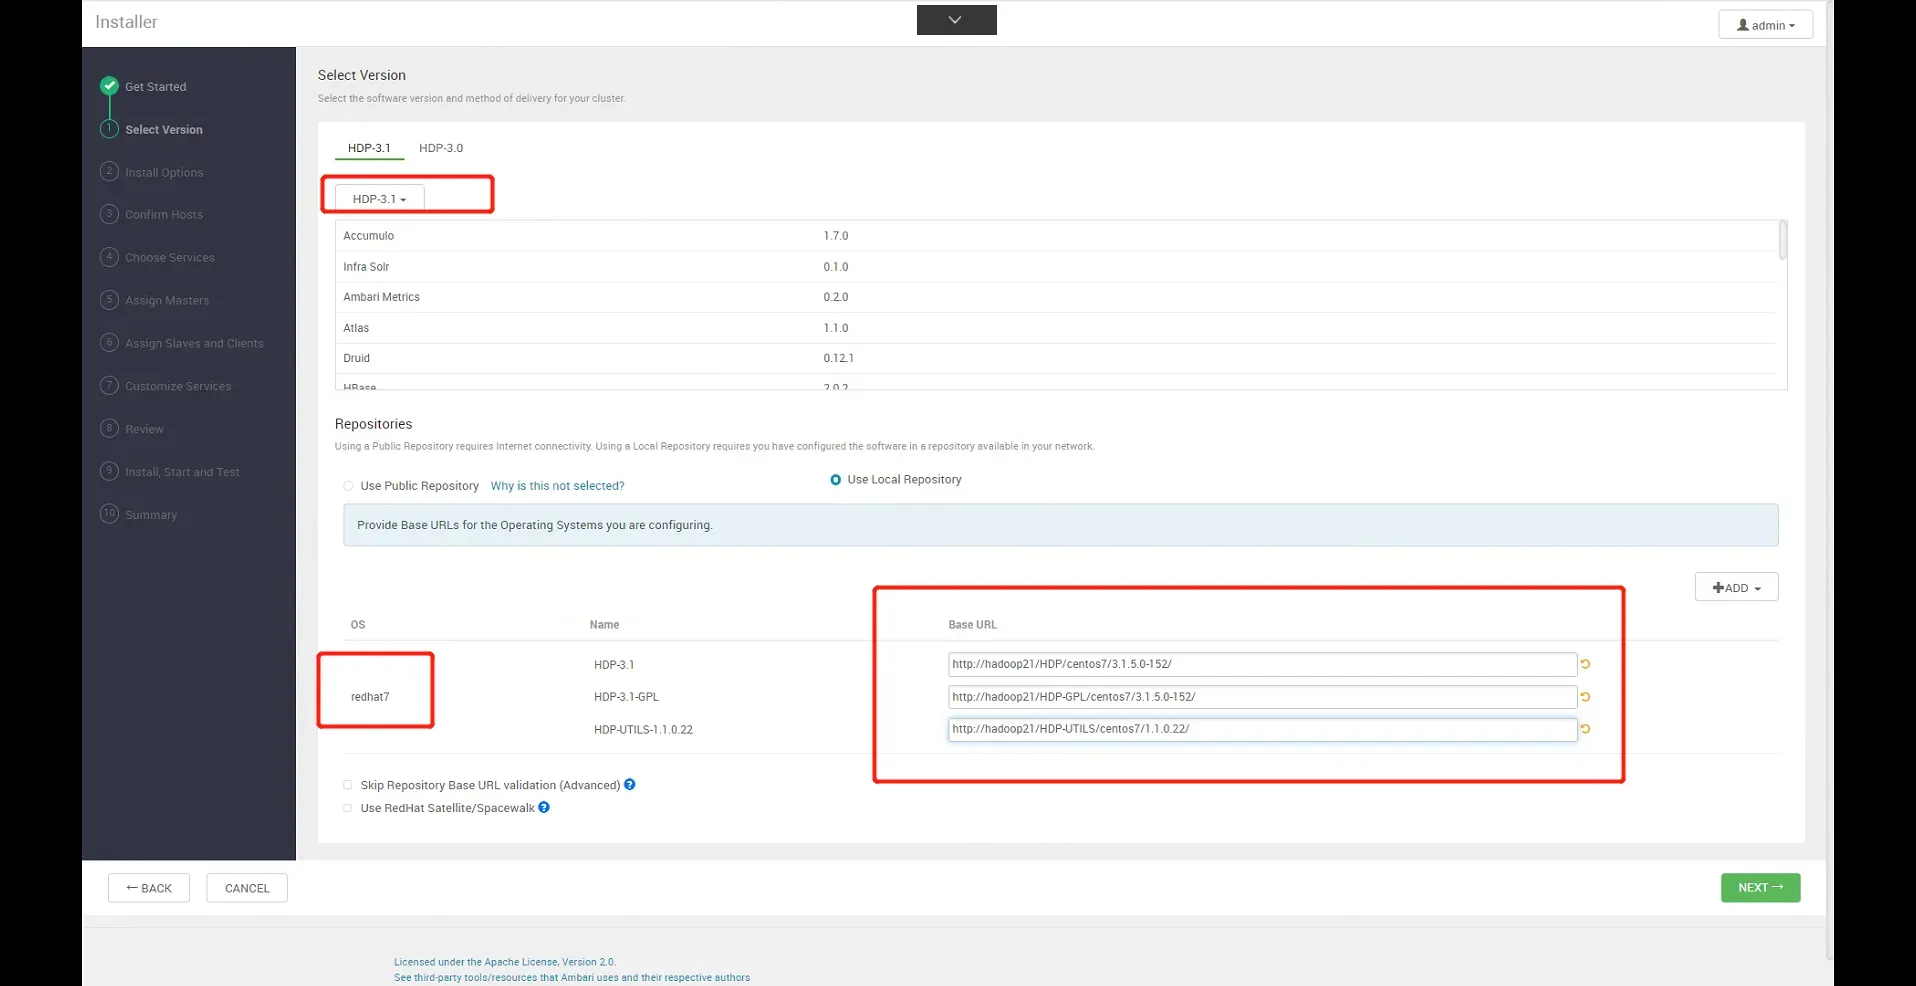
3)选择版本并修改本地源地址
选HDP-3.1(Default Version Definition);
选Use Local Repository;
选redhat7:
HDP-3.1:http://hadoop21/HDP/centos7/3.1.5.0-152/
HDP-3.1-GPL:http://hadoop21/HDP-GPL/centos7/3.1.5.0-152/
HDP-UTILS-1.1.0.22:http://hadoop21/HDP-UTILS/centos7/1.1.0.22/
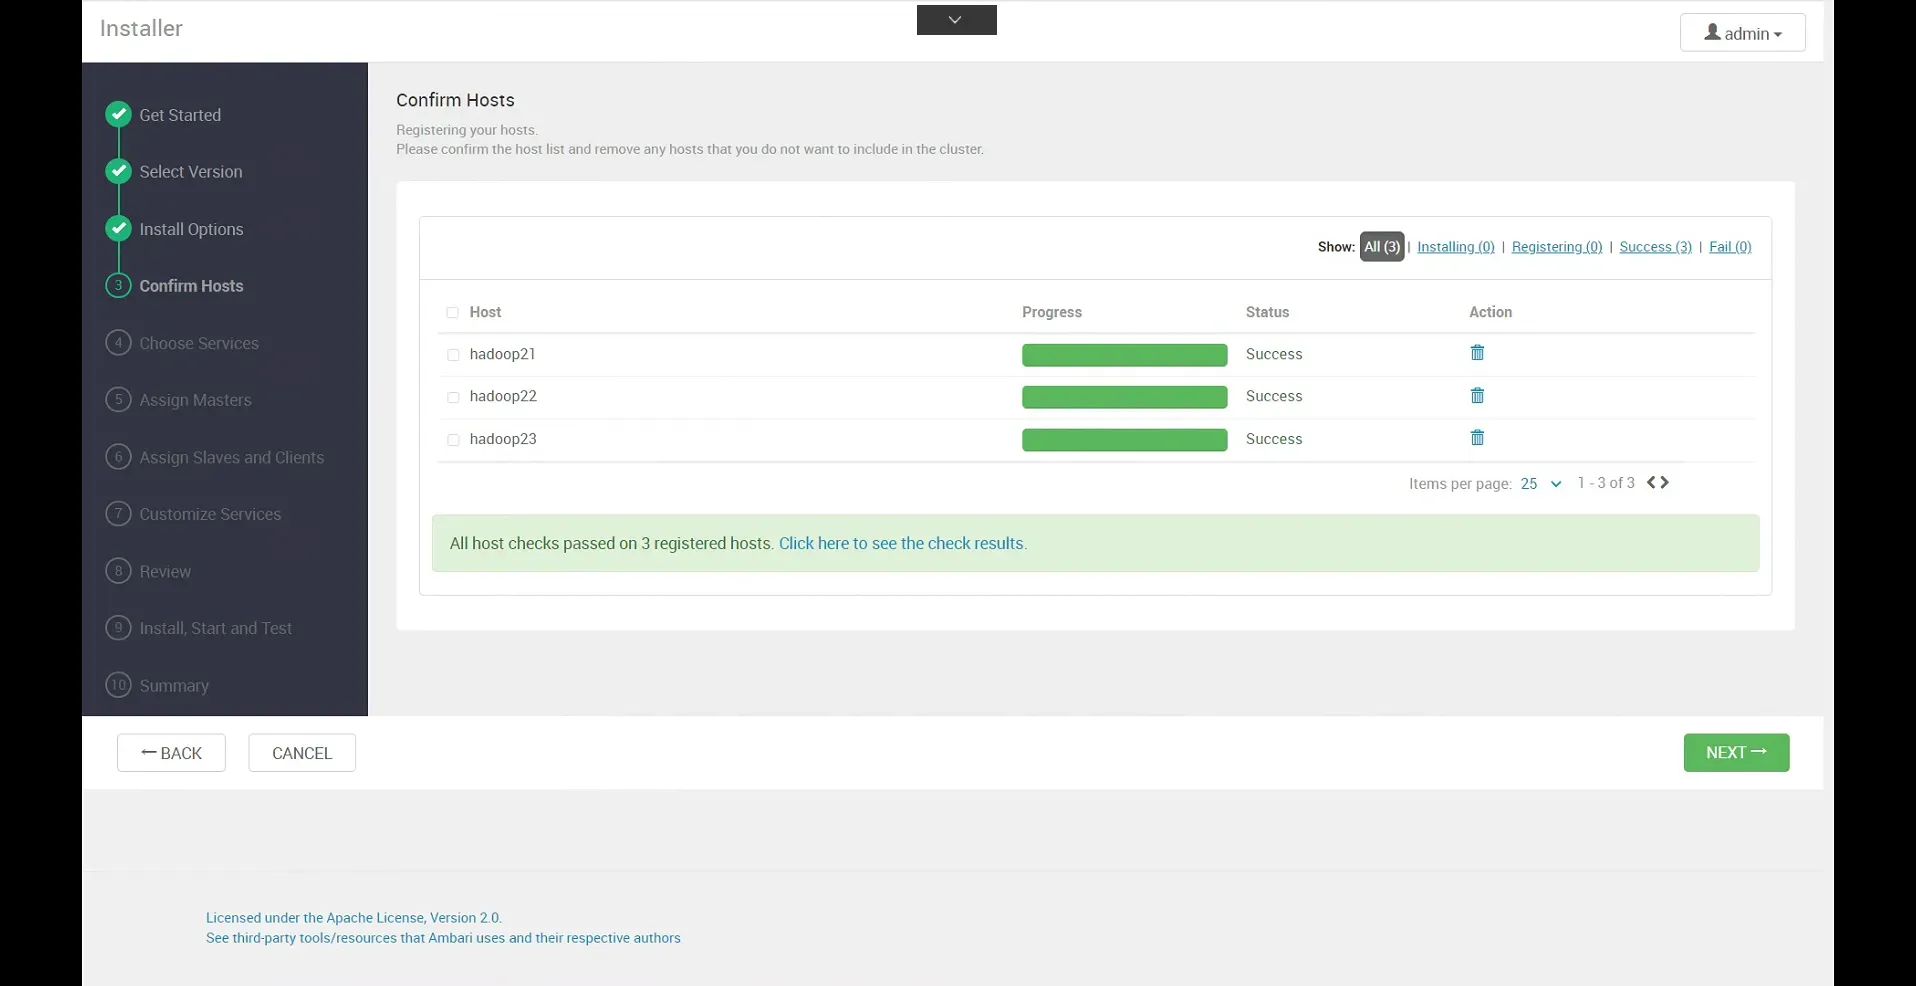
3.配置节点和密钥
下载主节点的/root/.ssh/id_rsa,并上传!点击下一步,进入确认主机界面 也可直接cat /root/.ssh/id_rsa 粘贴即可
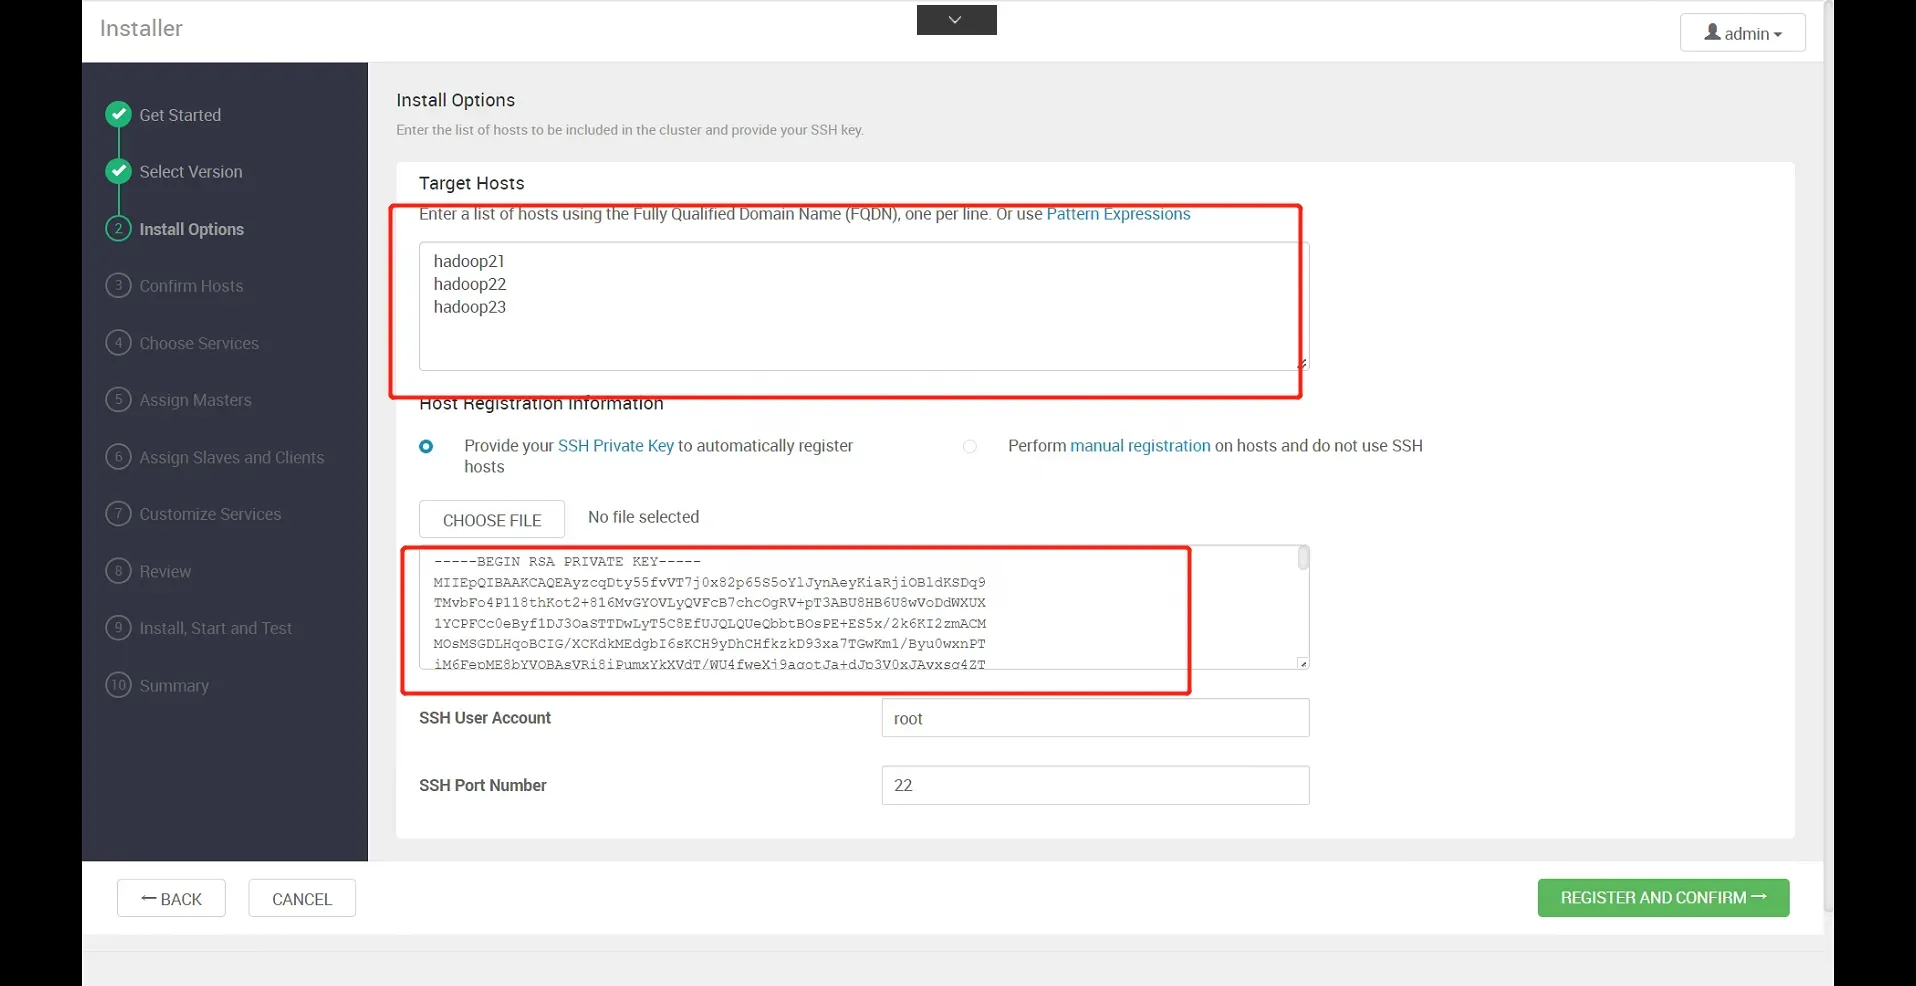
密钥验证成功:
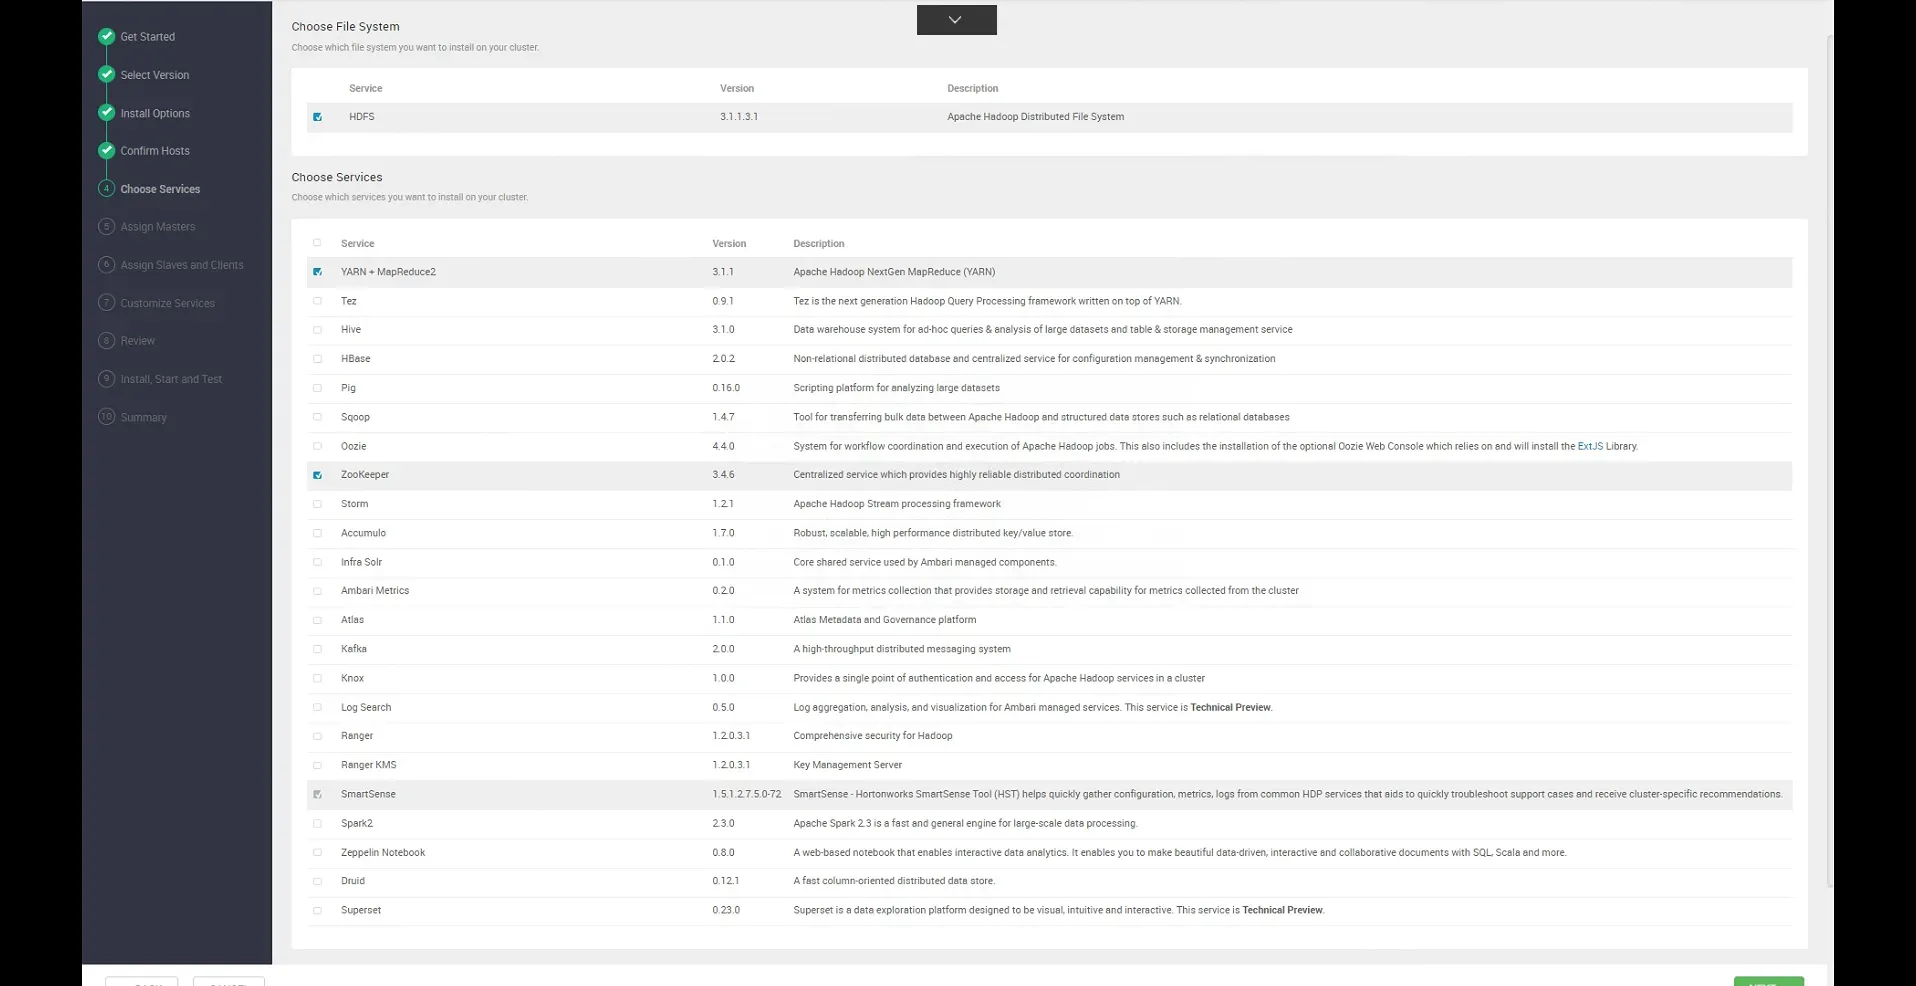
4.勾选需要安装的服务
5.按照默认配置
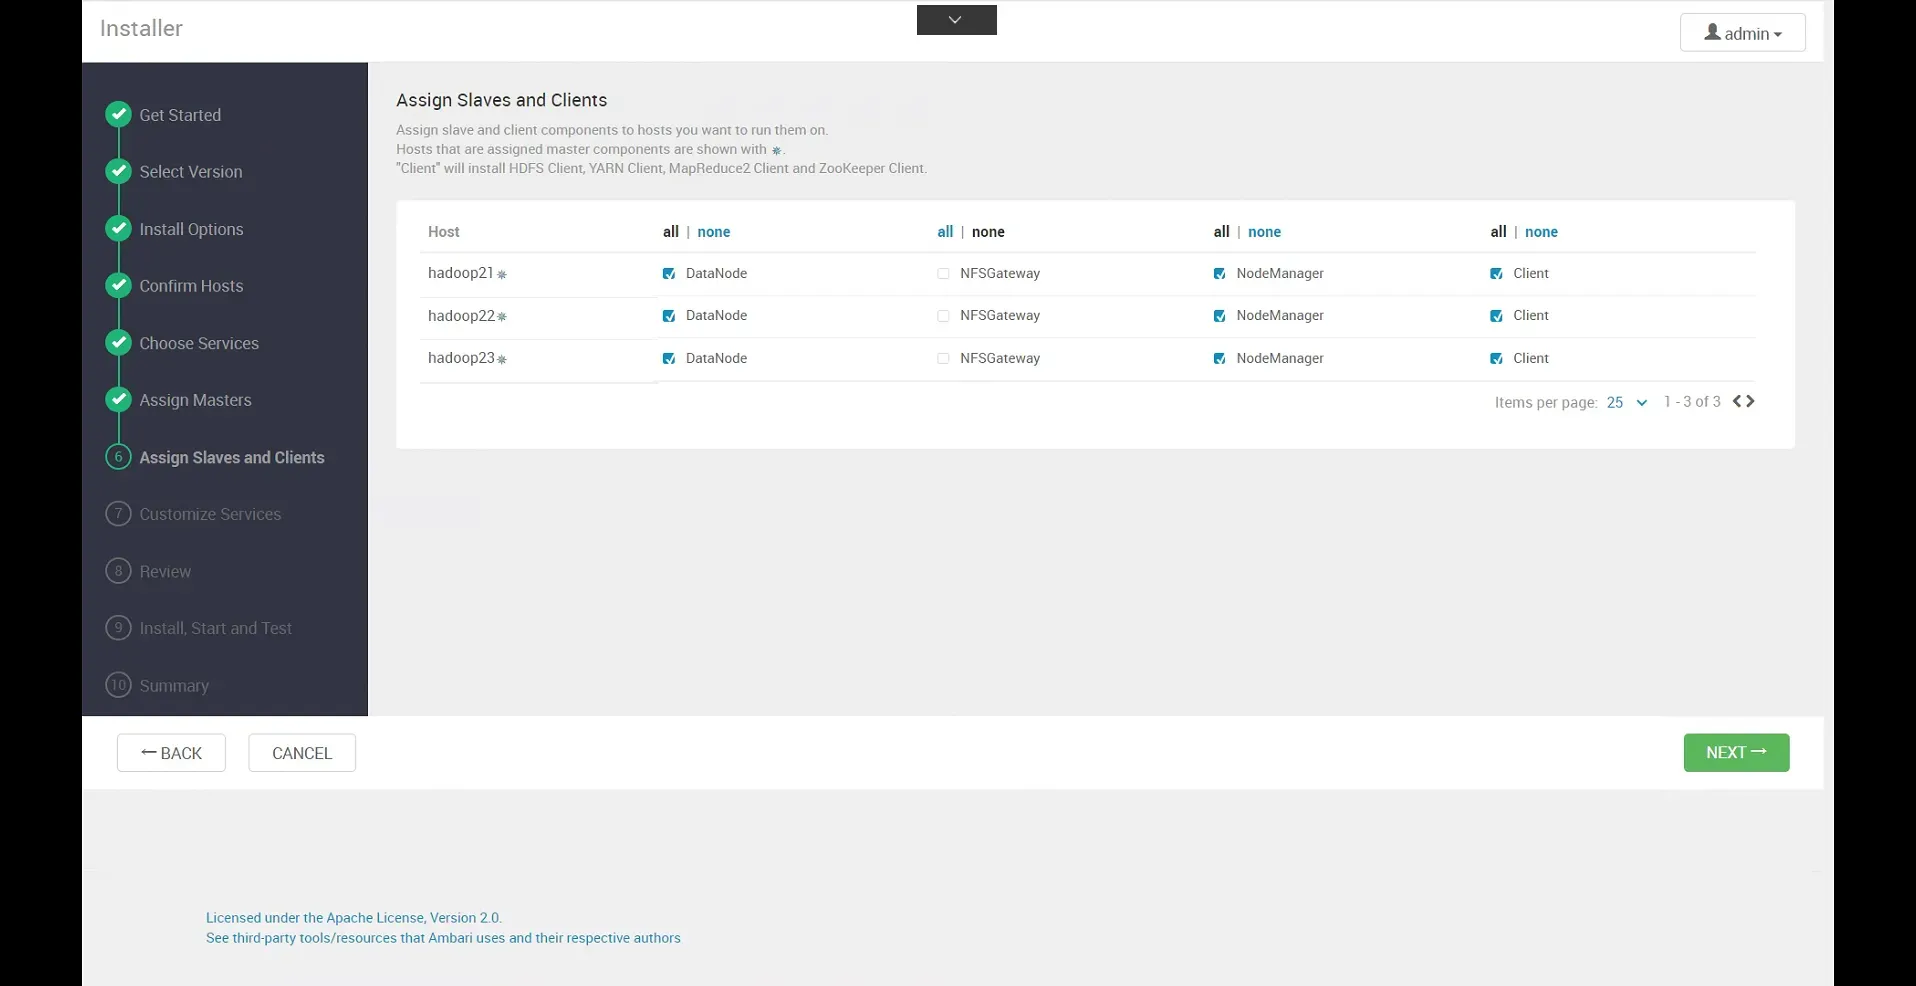
6.分配服务slaves
7.设置相关服务的密码(其他配置默认)
Grafana admin:123456 Activity Explorer’s admin:123456

8.编辑配置,默认即可
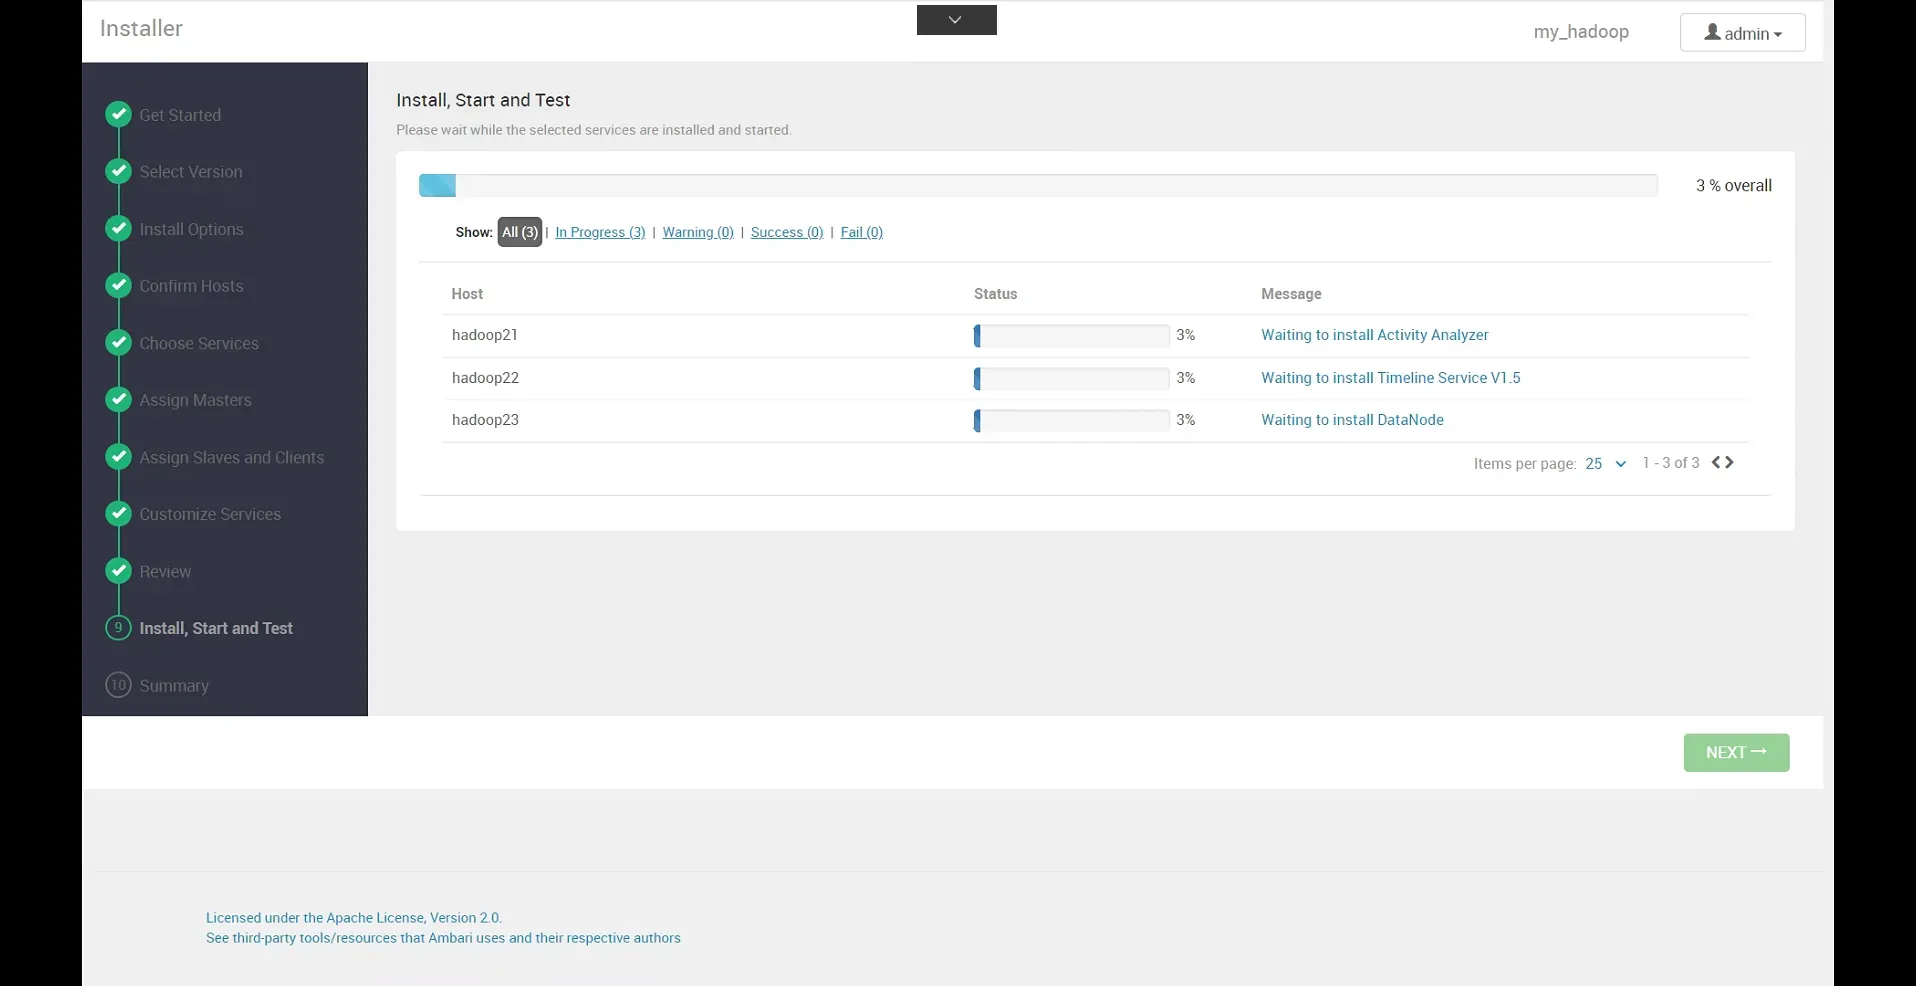
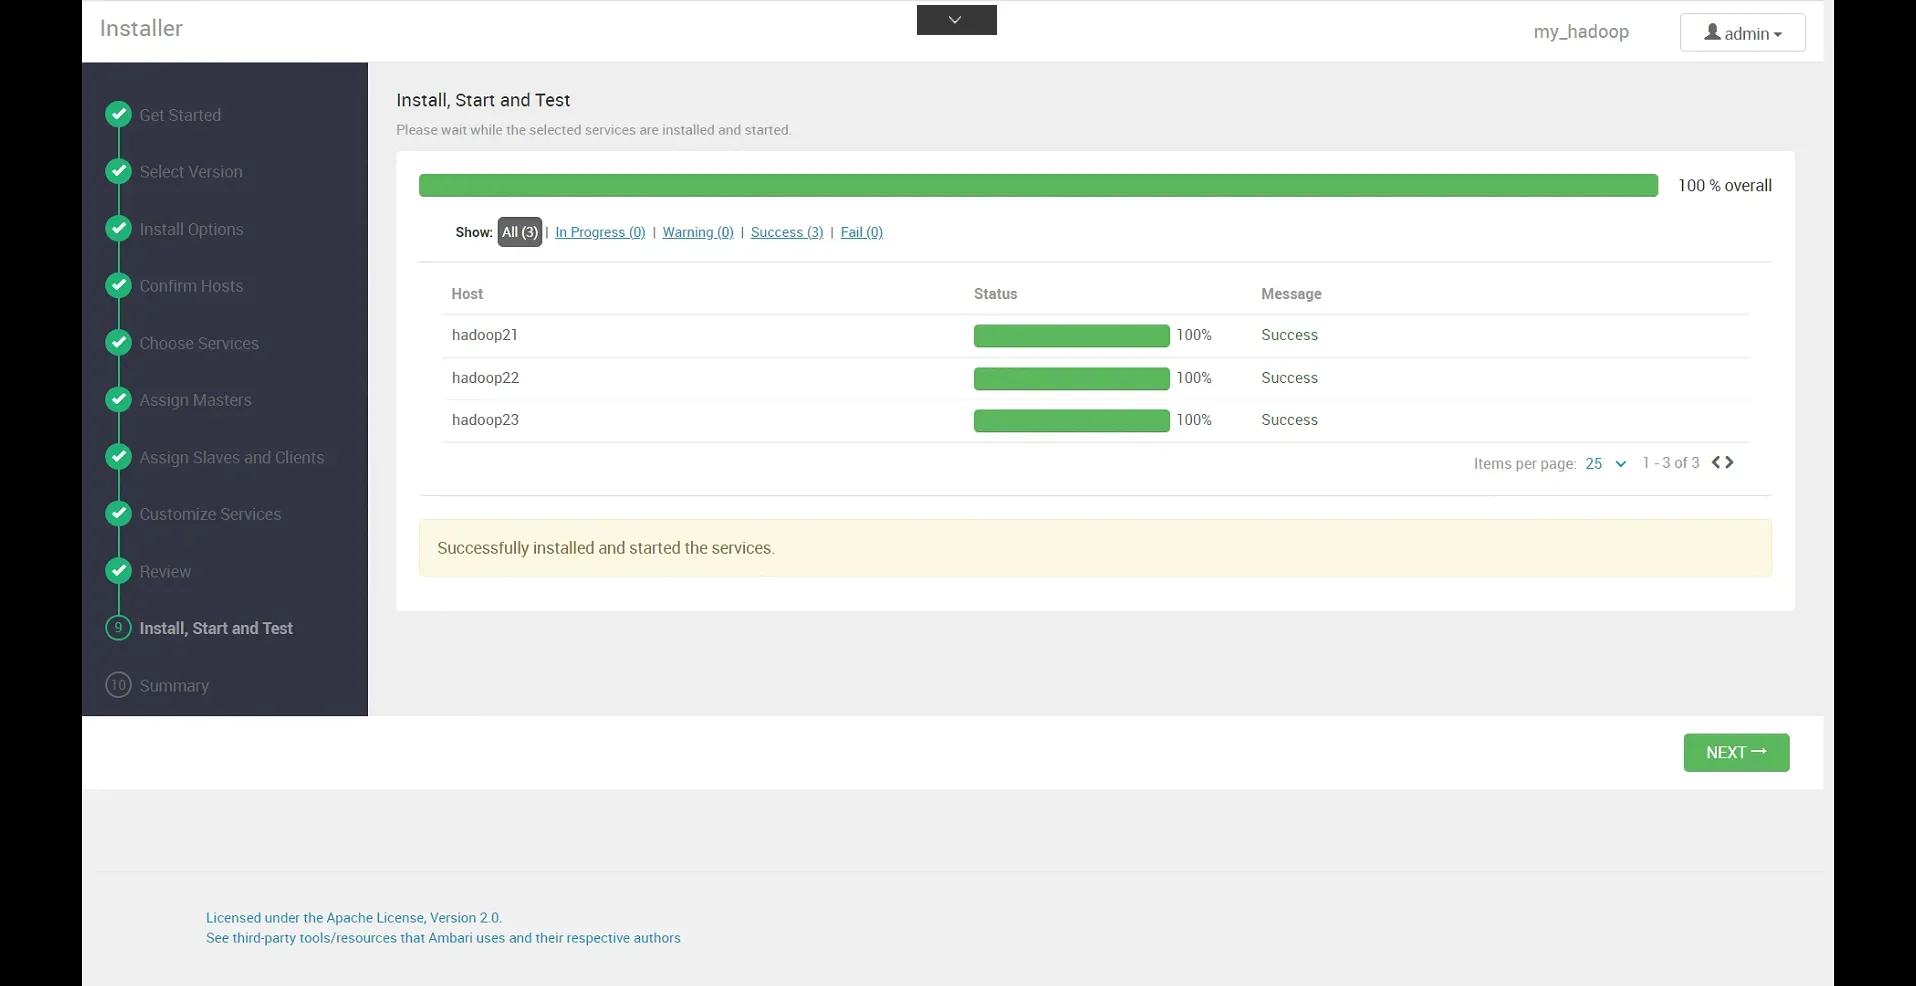
9.等待安装测试
10.安装成功
本文作者:Dewar
本文链接:
版权声明:本博客所有文章除特别声明外,均采用 BY-NC-SA 许可协议。转载请注明出处!